Never Ending Shop Remodel
My wife and I have been in our home for almost 6 years now and I had come to the conclusion last year that it was about time that I turned my shop (1/2 the garage) into a space I could actually enjoy being in. This involved clearing everything out, insulating the walls and ceiling, painting, re-configuring the dust collection, and changing the layout a little. So buckle up and enjoy what's been the last 6 months or so in my shop.

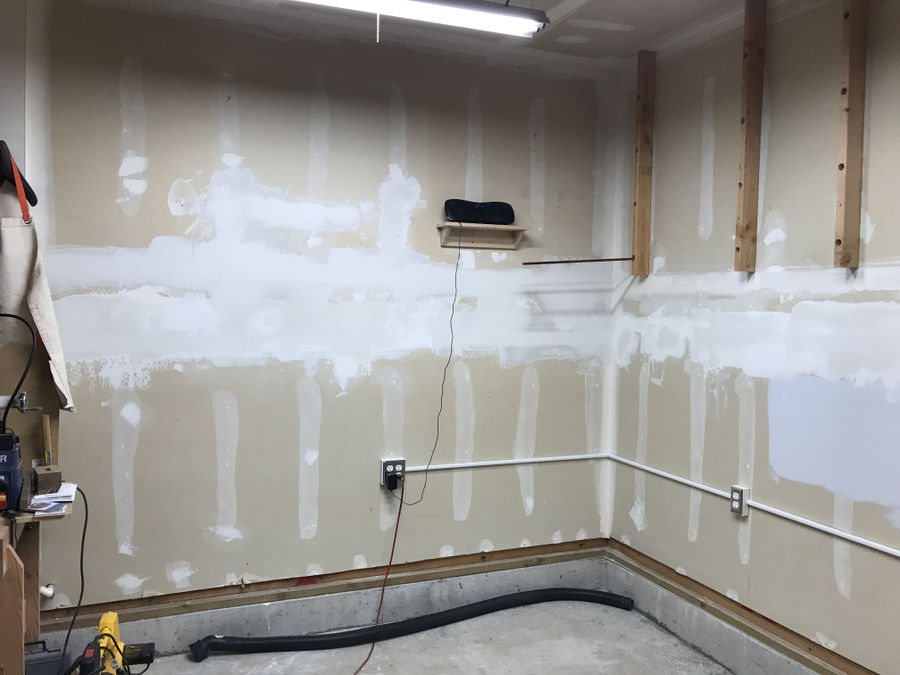
Here we start with the before: Pretty standard garage setup. Walls are all uninsulated, no paint, and the drywall wasn't really put up with the most care to begin with. I was working pretty cluttered by this point. We all know that the longer you're in a space, you tend to collect more and more stuff to fill the space. The space felt slightly dirty and the darkness around the ceiling didn't make it feel too inviting.

Looking the other way. My lumber rack is pretty imposing on the wall, but it can't really go anywhere at this point. My tool cabinet is overflowing and the shelf high on the wall was there when we bought the house. I wanted to be able to work on all sides of the bench, so it had to come away. I also had to either find a place for the walnut slab or sell them who can use them.
I also understand that someone might look at my space and think that it's a perfectly acceptable shop to have, and by all means it is. But we're all on our own journey in the hobby. It had taken me almost 5 years to build my shop to it's current condition and I felt like it was time to make the next step into what I considered a proper space.

First step was moving all the lumber out. For the majority of the remodel I hesitantly excavated my wife's car from her side of the garage to move everything over there. I first moved this longest bits out of the rack then everything else. I had accumulated so much over the years that I couldn't believe what was in there when I moved everything out.

This was the result of emptying the racks. Pretty good stack. I have been holding on to a bit of cherry that's earmarked for a new bedframe, but most of it was one off sticks I'd kept over the years.


After I removed the lumber I moved my bench and pulled to tool cabinet off the wall. It's amazing what it does to a space when you clear out the crap.

I sorted through the finishes that were in storage in the upper shelf, disposed of those that were bad, gave away the ones I didn't want, and tore the cabinet off and stuck it on the side of the house where it still sits rotting in the sun waiting for the annual neighborhood dumpster to show up.

Slabs moved and cleaned up. I should spoil it right now and let you know I sold the slabs. They would have been great to keep, but I got rid of them for the following reasons:
- I really didn't have a good place to keep them.
- They were not in the best shape. They came from a tree that had been dead for years and had some interesting checking.
- I needed the money for the remodel more than the material. There will always be more lumber when I need it later.
I also took the clamps down with their rack.

I pulled the conduit from the rack so I could stop trying to impale myself while on the ladder. I also disconnected the bandsaw and moved it to storage on the other side of the garage. You won't see it, but I then moved the table saw and jointer/planer to the same place.

With all my crap vacated from the shop, it was time to get to the first issue at hand: Insulation. I was not going to add any kind of mini split or climate control (funds, space, and panel space were prohibitive) but insulation is always the first thing you should do to control your shop's temperature. Otherwise you're simply dumping your heat or cool back outside with uninsulated walls.
I had a good friend who runs an insulation business and offered to help be do the job. Blow in was the best option as it was the least invasive, efficient, and the price was right. It always pays off to have connections in life, which is why you should make as many friends as possible....then exploit them. Lol. (I'm kidding.........or am I?)
For the blow in, we cut holes in each stud bay for the blower which will be patched later. If you don't have a friend who owns a business, the big box stores rent the machines (which was my original plan anyway.)

I manned the hopper and fed in the compressed bats of fiberglass. My friend worked the hose and air control. The blue hopper has what is essentially big mixing arms that break up the compressed bricks into their light and fluffy state before it's shot down the injection tube.
They normally operate out of full size box trucks, but this was their mobile setup for smaller jobs. Here we are working out a clog in the line from a section that was a stepdown. Cleaning up this stuff was TERRIBLE. It clogs the filter on the shop vac in an instant and you're better off sweeping up as much as you can then vacuuming the rest. They normally use a modified leaf sucker to do it, but it was not with us at the time.

After the bays were stuffed, you use a styrofoam cork and plug each hole and mud everything up. I was also testing out potential paint colors at the time.
Mudding the walls properly was by far the worst part of this whole remodel. The drywall was installed so badly I had to do tons of leveling and reworking the seams. It took me several days to get it looking good on the joints and after our insulation surgery.

It was the same on each wall.

We did really good on the insulation except for this little bit next to my breaker panel. I believe there is some extra framing here for when the power stubs into the panel and the meter outside. I know it's not ideal, but it was the only cold spot on all the walls that we hit. (The hot spot next to it is the battery backup for our Fiber ONT) I didn't push the issue since 1) I didn't really care too much and 2) it was really nice of him to help me out as it was.

After what seemed like 4 days, I decided that I had done enough mudding and it was time to move on. It was just a shop after all. This meant I could do final sanding on the new stuff and take the speaker off the wall.

I chose to prime the walls before the topcoat. The sheetrock has been bare since '93 so it needed something to make sure the paint would adhere correctly.

It went on very gray but dried to a normal white. With a uniform color down it's amazing how much of the patching disappears. It's almost like it's halfway decent.

I didn't bother masking off the lumber rack because....reasons.

With the primer dry it really helped the space feel finished. The walls brightened up the space and no more shoddy looking sheetrock.

Taking the primer all around. I ran out at the right side of the garage door, but it works for what I'm going for.

I ended up going with a light gray/blue for the final color. I didn't want pure white, but my original gray was too dark. I think this was just right for the shop. Still bright, but not as harsh as before.

With the outer walls complete I moved to opening up the ceiling in preparation for insulation and electrical. The house is laid out in such a way that there is a bedroom above the car side of the garage, but mine is open trussed. This was nice because I could extend the lighting circuit so I had dedicated outlets in the ceiling for my shop lighting instead of feeding everything off the one outlet like I did before.
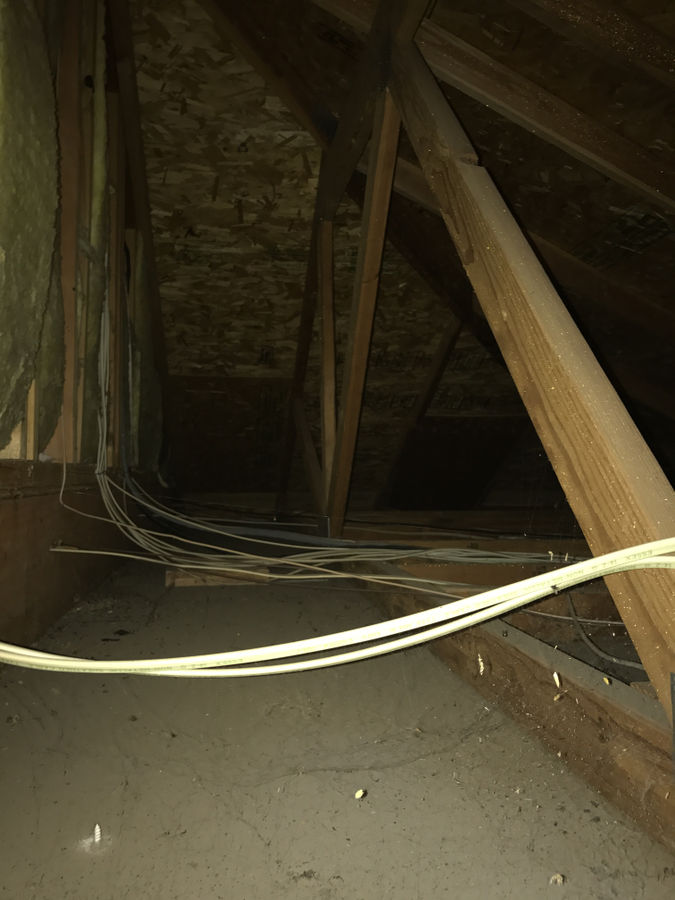
Glamourous. Also, every circuit run in my house.

My panel is full, so I wasn't able to run more circuits, but I daisy chained the garage lighting circuit to two new boxes for the lights. I was already running them on the circuit before, this way I eliminate dangerous extension cords/power strips from the one outlet. Makes the ceiling a lot cleaner.

Exhibit A: New lighting outlet.

State of the shop at this point. You can see the new outlets in the rear.

Better shot. I rotated the lights 90 degrees for better lighting over the bench area since that's where I'll spend most of my time.

After finishing wiring we blew in the ceiling. I was going to lay down a really thick layer, but it would have needed us to open another bat of material so we only put down 12" or so. The garage doors will be the biggest thermal weakspot in the space, so there was no use putting in unnecessary amounts here when I'd be losing heat/cool there.

Sealing the ceiling back up. I came back and did a tape/mud on this to make it disappear.

I called an audible and decided that the garage door opener was going to go. It was original to the house, didn't have a remote, and I can't remember the last time I used it. It was taking up overhead space and when we sell the house we would have swapped it for a new one anyway. So, bye!

It really made a huge difference taking it out, and it allowed me to put the lights in the same configuration over the table saw as I did over the bench. You'll notice I also primed the ceiling, but not final coat. I'll never touch it so primer was enough imo.

Last open shot before we start moving back in.

First piece to come in was the sign. Christening the space and putting my old market banner to some good use other than rolled up in storage.

First moves were tools and the bench. I was still working out placement and seeing what felt good. I pulled the bench out and flipped it around so I was looking down the shop instead of at the wall while I worked. There's enough room to fit around all sides too.

View from the bench, makes my sign feel that much more justified at this point.

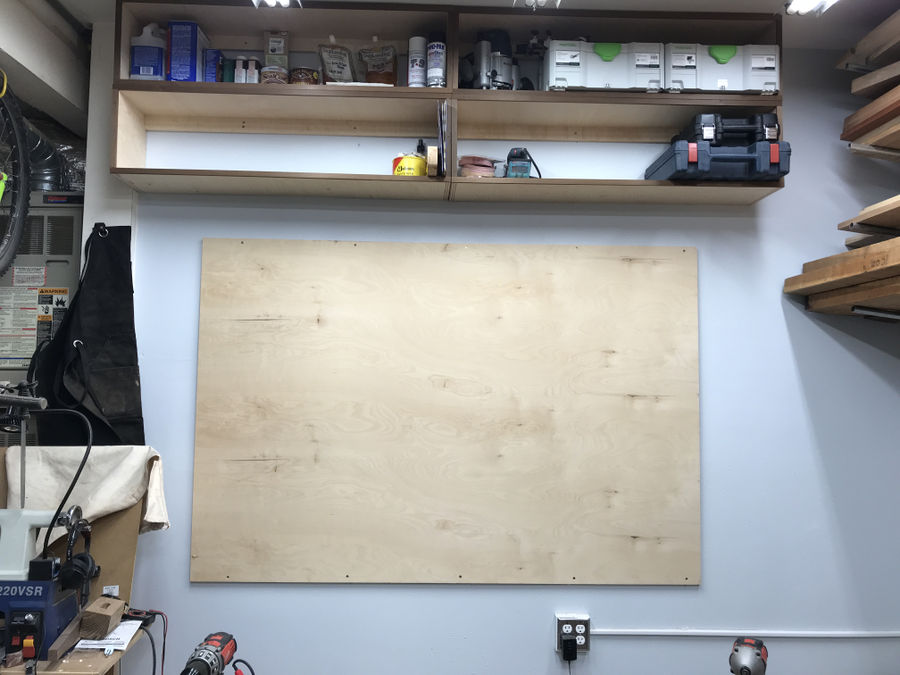
The back wall is the first point that needs addressing. I took down the awful storage box and I need a replacement. I was able to space out 4 wall boxes from two sheets of 3/4" ply. I used some hardwood edgeband on the fronts to dress it up a bit. You can see the first on the bench. Simple glue and screw here.

They went up really easy, but don't look too close! The wall is so uneven that the faces don't match up and I wasn't going to sit and shim everything to flush. For what they need to be, it's perfect. These are great for my finishing supplies and tools with boxes/systainers.

Desperate times....

Dust collection was next to be addressed. My old system worked, but it was ugly, had leaks, sucked in the wrong way, and was bulky. I cannibalized the blower off the HF unit (sent the rest to the recycler), and mounted it high. This gets it out of the way and provides room for the cyclone.

Doing this from scratch was hard considering there's no cheap way to find connectors/adapters with the proper ID and OD. The blower to cyclone adapter worked on one side....

But was the outer diameter below.

A crimping tool did the job to match this up. I just made sure to seal it from the inside and outside with the heavy duty foil tape. It isn't the flimsy stuff, but the thicker tape that is super sticky.

To hold the cyclone I made a shelf that sits on a cleat. It's like a fancy french cleat with dovetails and made of walnut. There is a gasket between the cyclone and the shelf where it drops down to the bin.

Here is where I collect the first stage separation. It's great. Way better than my old thien baffle top hat system. That one was pretty involved when it came time to empty the bin. This is a simple lift of the lid, let it sag, and take the can out. I do need to trim the hose so it is more straight to the can.

Ideally I wanted to keep the main trunk as high as I could without obstructing much. My only worry was that the new setup wouldn't be able to pull the chips all the way up the verticals. More on that later.

I swapped the bag filter for a Wynn canister. I used the method DIYTyler uses with a bucket on the bottom to make the second stage clearing easy. Just a twist on the gemma lid and it comes off to dump the fine dust and blow out the inside of the filter.

Me trying to figure out best placement of the filter stack.

Thankfully the large gray hose from the DC fit the coupling. I was able to get the line in and all sealed up. The filter hanging from the chains works, but I plan on giving it some arms to hold to the wall later on. Chains hold the weight, arms would hold it steady.

Outlet into the filter stack.

Filter is hung and now I can focus on plumbing in each drop line.


First is jointer/planer, second is tablesaw, third is bandsaw, and 4th is lathe. I changed my blast gate design so it would have a full block and passthrough on the paddle. (Before it was half as long and you pulled it out to engage suction.) This way, there's no way for air to get in while you have the blast gate open.

Better shot of the new blast gate slider and third to fourth drop.

IT WORKS! Plus I can pull pieces of solid wood from the end of the spine all the way into the bin.

Overall shot of current state and where the DC line runs.
Replacement for the tool cabinet is a tool wall. Better to show off the bling...and to keep all my most used tools at arms reach from the bench.

Good summation of my feelings so far. Couldn't be more pleased with how the shop looks compared to before.

Clock went back up with a dedicated power line and reset switch. This is a simplex clock that's made to accept a reset signal from a master/slave system. I can spoof the signal by powering up the line with the switch. Eventually I'll finish my homebrewed version, but this works for now.

Saws up! I had the 4 on the right custom built by Brian Noel at Bearkat wood and wanted a way to show them off. Each hanger was custom fit to the handle and with the clasp there's no way they're falling off the wall. My two panel saws are restored disstons in crosscut filing because ain't nobody got time to rip a board by hand when a bandsaw is available.

The lathe corner was one of the most anticipated changes to the shop for me. I have little practical experience turning and want to change that. This way I have all my chuck jaws and whatnots on hand. I have yet to make handles for the tools that I have, but they will go in the space on the right for easy access. I also need a hook for the face shield.

Wood is back in stock. It's still overpowering where it is, but the long boards on the bottom will be gone once I start on the bed frame. We have plans to build a shed in the backyard this year which will become cold storage for my lumber. I'm hoping that will let me keep a lighter amount of lumber in the rack and hopefully remove the bottom rungs of the rack so there's more headroom.

I still had to find a place for the leftover scrap that I couldn't justify into the burn pile. Much of it went into the supplementary rack above the car parking spot. I've been using it for cutting boards and other small gifts we need for weddings. From now on I keep a much stricted scrap policy so I don't end up like this again. In all honesty, if it's not big enough to make a cutting board it's gone.

Another critical aspect of the remodel and biggest reason it took so long to consider it done is the workbench storage. I have a whole different build log for these in my profile if you want the in depth version.

Way more available storage. It's a beautiful thing.

New plane till was also in order. I consolidated everything to one location and it's worked well. I moved from bevel down to bevel up planes over the last year and enjoy them much more than the traditional variety. I still need to add a magnet behind the toe of each plane and add a paracord lasso that will loop the knob to keep them safe and sound.
The placement is admittedly not the most ideal being so low, but it's also nice that they are easy to grab when I need them. If I had another food of wall space next to the tool wall I would have put the till about 1-2' higher. But, for the compromises I've had to make, this is great.

Bench area as it stands this week (June 2018). There are still more tools that will go up on the wall, but they will come as I have more time to think of ideal placement. I forgot to mention that I added some non-fatigue mats all around the bench area which make a HUGE difference. They're just the inexpensive foam ones, but I'd really like to do the whole shop with the rubber tiles. That's on the list for workshop v3.0 :)

Closer look at the plane till and tool wall.

Lathe corner in operation. You can see I'm still suffering from some of that 8/4 stock next to the stand. With the shed coming soon, it will get a new home.

Things that are still needing to be done are getting rid of the flip top table and instead building a outfeed table based on a scissor table. That way I can use it at both the table and bandsaw. I also have two pieces of art I'm making frames for that will go up on the wall for some inspiration. I also need to just clear out the last little bits of junk that never seem to move away from the tablesaw side table. I love my shop vac, but wish I had the smaller model.

Feeling a lot better about this than before. The dust collection corner is night and day from before. I still need to add some small storage bits here and there, but the cleanup is in progress. Last few things are some pieces of dust collection tube that needs to head to storage.

Before

After

Before

After


Shop looks fantastic! What do you use for outfeed support or did I miss it in your description above?
Right now it's nothing. I mentioned in one of the photos that I will be building a mobile outfeed based on a scissor table that I'll be able to use for the tablesaw or the bandsaw when needed. That should be coming up fairly soon.
@Sean said:Wow, it sure does look like a lot cozier place to be.
That was the #1 thing I was going for. I didn't want to feel like I was shoved into some dank garage and instead wanted a clean space. I think it will get even better when I can hang up those frames.
@Timmy2Hands said:What's the temp of your LEDs?
Don't quote me on it, but I want to say ballpark 4000k or "Cool white"
@Sean said:Looks great Scott!