Crib Of 1k Mortises Or How I Learned To Love The Board
This is my submission for the August r/Woodworking competition .
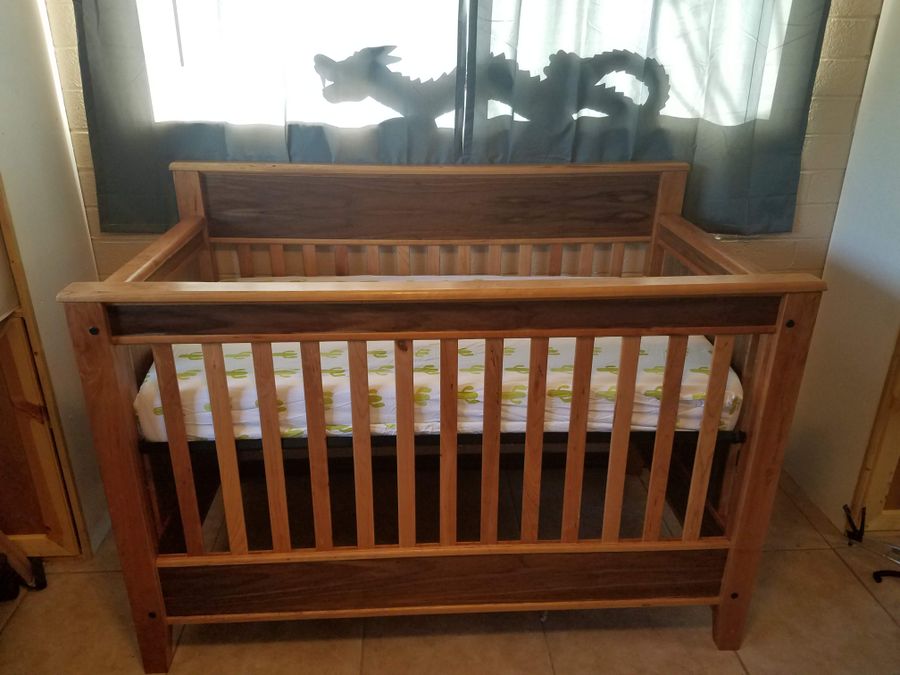
Finished picture first; this crib is my entry for the August r/woodworking Mortise and Tenon competition, and something I was planning on making anyway. There are 8 mortise and tenon joints in the head board and food board and if you count the slats, there are 108 additional joints. I learned a lot during this build as it was my 1st time working with hardwood and making an heirloom piece. I tried to highlight all of my failings so if you have any advice I'd be happy to hear it. That said I'm really happy with how it turned out and boy is that cherry wood pretty.

I was inspired by u/chetfilmore's fantastic rendition of the WoodMagazine 3 in 1 bed which he posted a year ago. All I had to do was get my wife pregnant; and here we are. Now this is my 1st time working on a project that isn't made of mainly pine or plywood. I had bought a ton of cherry but was paralyzed and terrified to work with it.

The company that made the hardware kits went out of business so I turned to craigslist to get the parts and a mattress. That's right, the 1st step to making a crib is to buy a crib.

Now I am only building the cirb and not the toddler bed or full sized bed parts. Because of this I had to remake the cutlist. If you haven't used it yet try out Gary Darby's cutlist program

Finally I was ready to work on the lumber. This started with planing down the cherry and adding a new shag carpet to the workshop. I actually save these shavings because they make awesome packing material for small commissions. Ok, not so bad, I've done this with hardwood before.

I then jointed and ripped to final width all of the parts. This is a 60 year old 4 inch planer which is really way to small for this operation. I didn't realize how important the in-feed and out-feed of a planer is to it's operation. I ended up re-jointing most of these edges on the table saw.

Finally I can cut all the pieces to final length. Things are all moving smoothly, didn't screw up any of the pieces too bad.

Finally it's time to work on the 1st mortises. The legs are made from 3 pieces of cherry laminated together.

I clamped the middle of each set of legs together to cut the mortises exactly the same for both. I started the cuts on the table saw and then cut out the waste on the band-saw. A quick lick with a rasp took out the band saw marks.

Time for a hasty, poorly aligned, messy glue up. 1 of 4 done!

Look you purists, I used a chisel just like you. (Though it was only to clean up the squeeze out) I also re-milled these boards on the table saw to true them up. I didn't want to use the jointer because it's pretty bad at taking small shavings. More burns but a smoother finish.

All of the mortises are done and all that's left is to cut the bevels at the bottom edges.

Ahh, 4 pretty nice looking legs. I finally feel a little comfortable about this project.

Cutting the 27 slats took forever and I had a hell of a time getting them all the "same" thickness. Here's 54 tenon's.

That's one nice looking pile of wood. I then spent a whole day rounding corners, sanding out burn spots and finish prepping all of the pieces, a real marathon day.

AAAAAnd then it POURED. When it rains in Arizona it comes really hard really quick and the workshop leaked right on top of my finished wood pile. Thankfully the wife let me take over the dinner table to protect the wood.

Next I bought the walnut plywood and broke this down. I didn't want this sitting outside too long in case it got wet as well. They didn't have plywood core wood at the local workshop so I got MDF core which made me even more paranoid about the wood getting wet.

I re-sanded all of the pieces up to 220 and the wife agreed to let me do the assembly inside to decrease the risk for the rest of the project. (Yes that's 2 boxes of baby clothes 7 moths early, definitely have to make that dresser next)

Lets do the glue up! Wait, it might be a good idea to do a dry fit first..... OK... if you insist.... Ya, half of these pieces need to be finessed to fit. And what's that? Yup I made a mistake with the 1 change to plans I made... Joy.

Now if you're thinking, "these aren't real mortise and tenon joints because he's not cutting them with a chisel", boy do I have a problem fix for you.

I got rid of most of the waste with a forstner bit.

Wack wack wack and chop chop chop and there you have it, my 1st ugly hand cut mortise.

Ok, now the glue-up works fine. Time for glue.

Thus begins the laborious task of gluing up every section. I used every clamp I had and found out I can use a lot more mid sized clamps.

Before I glued the pieces into the legs I decided to add all of the threaded inserts and had to run out to the store. No problem, I have plenty of time before it rains and I definitely won't need to work outside.

Ya it poured again. What I want to point out in this is how the one stream of water actually bends over to get the blanket wet. (1.5 years until I can get a garage... just another year and a half. )

The reason I needed to work outside was because my parallel clamps were 1/4th of an inch to short for this glue up. I ended up making pocket83's f-clamp stretchers which worked perfectly.

I wanted to focus on the joint since this is the Mortise and Tenon competition. My joints weren't perfect. The plywood was under 3/4th so there was space side to side and a little in the back as well. I ended up flooding this with glue for some extra support.

Time for slats in the head and food board. This is finally starting to look like a bed. Here's also 54 more mortise and tenon joints.

The center slat was measured and placed specifically and then the slat retainers were added to complete the joint.

From there I just kept adding slats and slat retainers.

The retainers at the ends were cut to length to account for any error that added up. If done correctly they can be press fit and add a little more clamping pressure.

Now though out this you might have been asking how the sides attach to the headboard and footboard. I had been procrastinating this point because it uses cross dowel nuts and requires really precise holes to be drilled in everything.

This blurry photo was to show how I used a off cut to make sure I was drilling perfectly strait. I got it about as strait as this picture is clear. The answer to the alignment problems is to just keep expanding the bolt holes until everything can be aligned. A terrible process. If you make a bed or a crib, I'd recommend any joinery but these things.

Ok, next was gap fill. Not all of the joints went together perfectly, specifically the top rails had some nice big gaps I wanted to fill. I tried to get cherry filler but couldn't find any so I turned to the saw dust and glue method. I don't like this method because I have a tendency to use too much glue and ruin the finish but it worked out well this time. I cut up about half this stick getting saw dust on the band saw.

Here's what you need. Sawdust, a mixing container, glue and a application and stir stick. I like the old screw driver because it has sharp edges which make it nice for applying the filler to tight spots. I mixed the 2 pieces until I had a really dry mix which helped prevent the glue from ruining the finish and then I would immediately clean it up with the screwdriver and a chisel.

Apply liberally and scrape off quickly. My gaps were only 1/16 at worst but this still made a huge difference. If I was to do this again I'd create the dust some other was as my dust was too course. A more fine grain dust would have helped.

I like to saw good gap filling is the difference between a good and a great woodworker. I'm no way near great but this helps me pretend some times.
This is probably something only I will ever notice but I'm still really glad I did it.

Finish sand in all of the odd areas. If I was to do this again I might make the slat retainers stand a little proud and then sand them to flush. As it is they're a little recessed so I wanted to make sure there were no sharp edges.

Ok, time to hang up all of the pieces and apply the finish. Looks good..... wait, I never did a full dry fit.... what if I messed something up....

Ok, it fits fine and is solid as a tank. I was really nervous about that.

Aaaaaand it broke while I was taking it apart. The joints are really great for horizontal and vertical strength but don't do so well when pushed diagonally. Thankfully the chip glued back in really easily and was hardly detectable when sanded.

Ok, so here's the finishing process. Spray down with my 16oz compressor to open the grain, wipe down with mineral spirits and cheese cloth to get any remaining surface dust, and then apply a mix of 50/50 clear poly and paint thinner.

This is the 1st time I really get to see the great color of the cherry. The walnut was more brown in some areas than I wanted but still looks great.

3 coats down, looks fantastic and not one drop of rain. I definitely could have done more coats of finish but I was worried about another storm and I ran out of poly.

The last thing I do to prep the wood is a finish wet sand. After the finish is nice and dry, I wet the wood down with soapy water and lightly sand down with 800 grip paper. Then I wipe it dry and my final secret is to spray the whole thing with pledge. This helps clean any extra finish dust, gives a nice shine and if you do sand through the finish this fills the pours of the wood with something good. (Also it smells nice)

And here we go. All done. I did have to do a little fitting with the mattress support but that's hardly noteworthy. Thanks for taking a look.

aaaaand here's your dog tax. Momo is really kind to humor me with these kinds of photos. (She's also great practice until the real occupant shows up in 5 months)

- Views 1,569
- 4
- Collection 0
- Report project
