Assembly/Outfeed/Router Jointing Table
Due to having a small shop space, I don't really have space for a floor standing jointer, so I've been making use of other ways to do face jointing. It's easy enough to do edge jointing on the table saw, but faces are what I usually struggle with. For a while now, I've been doing it by hand, but with some rather large projects coming up, I really need a way to not tire myself out just dimensioning wood.
I spent a while trying to figure out a way to fit a jointer into my shop, but decided it wasn't going to happen, so I need to find a better option. I debated a few ideas, but the best option for my space is definitely a router sled. I didn't have a good option for a table for it; my out feed table wasn't flat, and I didn't really want to use my table saw top. So I decided to make a flat out feed table for the job.
One of the flaws of my old out feed table is that it takes up a lot of space, and doesn't offer much storage. I built it when I was first starting out, and didn't really think it through. So another goal from a better out feed table, is to get better storage. However, since most of my shop is fairly organized without all the storage space below the out feed table, I want to come up with something that leaves me room to expand, without defining the storage to just leave it empty.

So, I started this project and then decided after I'd done a fair bit of work, that I was going to document it. It had absolutely nothing to do with the timing of when the contest was announced, no siree, certainly had nothing to do with that.
So, steps to get here. I started by jointing the sides of 7 2x4x8s. Cut two of them to 6 feet long, and the remaining five to 4 feet long. I put the two long ways across my saw horses, and then the five crossing those two beams. Then, I used a level and shims to level the entire thing.
With that done, I put a slightly over 5x3 piece of 3/4 MDF on top. I cut a bunch of MDF strips to 2 3/4 inches wide, and I cut about half of those strips into 2 3/4 inch squares. Then, I laid out the strips on the large sheet of MDF in a grid pattern, and put another piece of MDF on top, putting glue in between each joint. AKA, I made a torsion box.

The one part I screwed up on, was I didn't put a long strip across all four sides. Instead, I simply forgot about that, and ended up with the two long sides being pretty jagged, since I couldn't line everything up perfectly. Normally this wouldn't matter, but my original plan was to use a sled with arms that came down and touched the table, so the sides needed to be flat. My local woodworking shop had a really long dado router bit that worked out perfectly to straighten the sides, so I just used one of the jointed 2x4s from earlier to straighten one side. You can actually see in this shot that the bit doesn't reach all the way down, and I had to make another pass from the other side to get it right.

To get the two sides mostly parallel, I used another of the jointed 2x4s to reference off the straightened side. Since I had to make two passes on each edge, one from each side, I had to ask my wife for help flipping it over. Somewhere, she's got a nice shot of me covered head to toe in MDF dust. That stuff gets everywhere.

Here's a close up of the side. It's not perfect everywhere. I think the 2x4 I used for a fence should have had more clamps on it. However, it's good enough, and the places where it's off, it's just cosmetic. I ended up not going with the sled design that needed this, but I might go back to it at a later date.

Next step, add some legs. I ripped a few of the aforementioned 2x4s in half and made some a pretty rudimentary base. The legs are salvaged from my temporary workbench base.

I measured my router base, cut a piece of plywood to the same width as the router base, and 4 feet long. I cut the scrap pieces in half, and attached them upright on either side, then put some paste wax on it.

And it fits. That's good, because I didn't test after I cut it.

I cut a few pieces of the scrap MDF to use as rails. The problem was how to get them out of the way when I don't need them. After debating it, I decided I'd try a few, and switch to whatever works best after trying each one for a while. So the front one, I figured I'd clamp it into place and make a place for it to sit when I'm not using it.

On the back one, I had some piano hinge sitting around from a project I ended up not doing, so I figured I'd make use of that.

And here it is installed.

After the hinge was installed, I realized It might not stay where I wanted it to, so I made some blocks to screw it down by.

With some scrap 1/4th inch plywood, I made a few little things to stick up and hold the rail in place while not in use. I just glued them on.

Here you can see where they go, with the top all finished up, setup to joint.

And here it is with it all collapsed.

Now, time for some storage. My previous outfeed table had some storage, but not much, and the area under it was mostly just used as a place to throw crap. It got junked up quick, so I wanted to make sure I had a better system for this one. I took the top from my previous outfeed table and just set it on top of the supports for the legs. Amazingly, it fit. I didn't plan that at all, it just worked out. I just needed to cut off a little less than a foot, and it fit perfectly.

After cutting it to size, I put a rail up on the left and right incase I wanted to use the shelf for storing cans of finish or paint later on. Right now, it's full of what I call shop wood, which is dimensional lumber or sheet goods that have already been used once. I expect to use a lot of it, and not generate much more, as I'm moving more towards permanent shop furniture, so once it's cleared out, I suspect it'll be where I put my finishes.

Now, the reason the earlier shots of the router sled didn't have a slot cut, is because I broke the plastic bottom thing on my router base and had to wait for it to arrive. Now that it's arrived(along with a cool little dust collection add-on), I can actually cut the slot.

After the slot was cut, I marked out what the farthest on each side I wanted to go was, and then put a little block to stop the router from going any farther.

With dust collection hooked up, this thing is still a mess.

I put the sled through the table saw on its side to cut the sides down to a more reasonable size.

And then put it where it goes. This also was not planned, but worked out nicely. The sled fits right between the shelf top and the support 2x4 below. You can also see the shelf is already filled up with scrap.

From there, I made a few boxes to use as drawers. Nothing special, just boxes held together with pin nails, screws, and glue. The size of these drawers is entirely dictated by the scrap I had. This project has the secondary goal of being a scrap minimization project.

My wife bought these casters to use, but they didn't fit her needs after a few months, so I took them. This seems as good of a use for them as any.
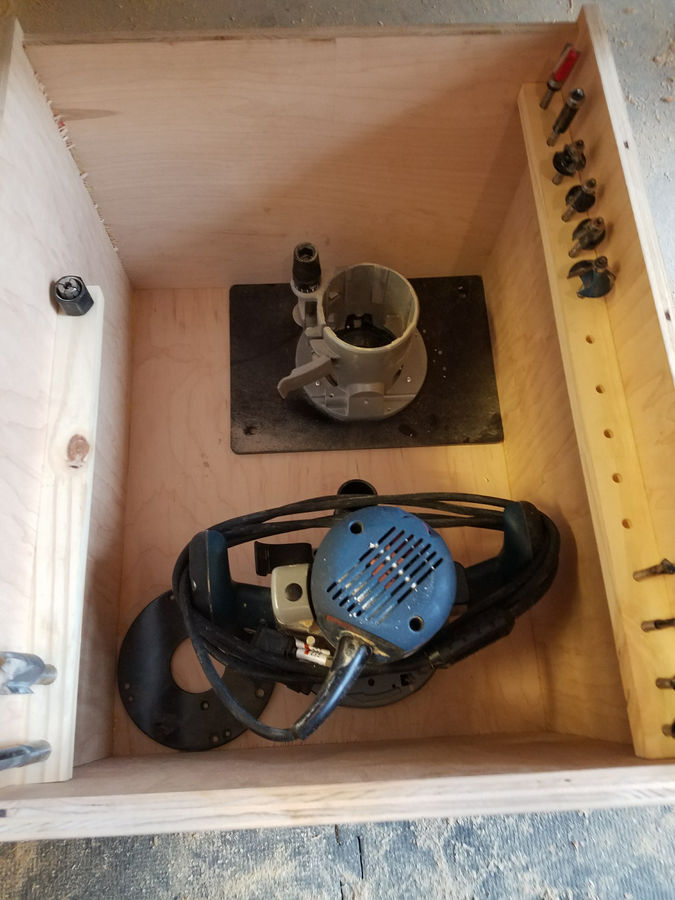
I did a little bit of work on the first drawer to make a place to put my router bits, and routers. The router bits are just sitting in a piece of southern yellow pine with holes in it for the bits.

Then I just made a little frame to keep the drawers where I want them. Again, using up scrap wood. The right side slot has a little place holder there, as I'm not sure what I'd put in a drawer there, so I didn't make one. I'm sure I'll need something to put there at some point, it's just I don't need it right now, so I'll leave it as is.

I just put one on each corner, it did a good enough job.

Here's the two boxes filled up. Left one has all my router stuff in it. Right one has glues, glue rags, tape, and my dado stack. The dado stack needs a better home, but this will have to do for now. Both boxes are taller than they need to be, so if I need more storage later, I can cut these down shorter, and put another rack of drawers above them.

This is how I seem to use it most. I don't really need to take down the rail on the back, as I'm never back there.

And here's the other side I see.

And of course, gotta test out the face jointing right? I just used a 2x4 scrap for a test piece.

Here's the piece after being jointed. It's not perfect, but good enough to come out perfect after being put through the planer.

- Views 308
- 4
- Collection 1
- Report project