School Box Guild Build
This is my version of the School Box that's featured in the book 'The Joiner and the Cabinetmaker' (Lost Art Press). If you want to build one of these yourself, check out the guild build that's currently going on. You will have access to the plans and step by step instructions on how to build it.
My box is made out of quarter sawn white oak and was finished with 1.5 lb blond shellac. The video below shows how I made it.


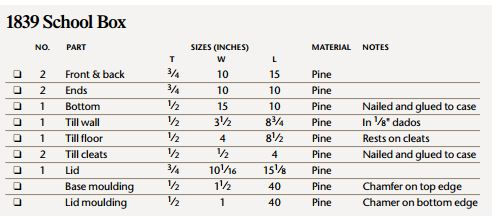
I begin this project by cutting the box parts to size. Since I'm using rough lumber and didn't have boards wide enough, I glued pieces together to get the size needed. To get the sizes for this project, check this image out: http://www.simplecove.com/assets/images/201d6a25-7b92-469a-8aef-750258bc1d28.jpg

Next, I laid out the dovetails with my dovetail marker, combination square and pencil. I like to cut the tails first but that's just a personal opinion.

I set my marking gauge to the thickness of the lumber and scribe a line on all 4 sides of the tail boards. This will indicated the depth for sawing.

Using my dovetail saw (This is a western style dovetail saw, but you can use a $30 dozuki from Amazon to cut these), I cut the tails, focusing on keeping the saw square to the board. The angle of the cut isn't as important as staying square. You can always cut the pins at that angle, but if it's not square you will run into issues.

Another shot of how I start the dovetail cut. With this western saw, I like to start on the edge of the board and work back toward my body. Again, just a personal preference for this saw. This old saw has been restored and this method works best for me.

Once the tails are cut, I remove the waste between the tails with my bow saw. If you're interested in seeing how I made this bow saw, check this out: http://www.simplecove.com/492/sapele-bow-saw/

And finally, I cut the half pins on the edge of the board.

I start to chisel away the waste, making sure to remove most of the wood in front of my scribe line (the one I set with my marking gauge) before putting the chisel in the line itself. When I remove the waste, I don't go all the way down, I chisel about half way down on all of the tails, flip the board over and remove the rest of the waste.

They came out pretty good.

I have this board laying on top of my hand plan (the plane is laying on it's side) and transfer my tails to my pin board to tell me what I need to saw.

I use the same dovetail saw to cut the pins.

Again, I use my bow saw to remove the waste between the pins.

Just like before, I chisel away the waste half way down, flip the board over and remove the rest.

This box has a lock on it so this is what i'm installing now. I line the lock up on the front board and use it to mark the area that I need to remove in order to mortise out the waste.

I use a chisel and small router plane to remove the waste.

Next up I scribe a line around the inside of the lock for mortising.

I use my large router plane to mortise the material away. If you don't have a router plane, a small trim router will work just fine.

The last piece to mortise out is the outer brass cover of the lock, so once again, I scribe a line with my marking knife.

And using my small router plane and a chisel I remove the waste.

And achieved a snug fit!

To remove the rest of the keyhole material I first drilled a hole (I actually drilled this hole before starting the lock installation) and stuck the blade from my coping saw in there and put the saw back together to remove the waste.

I pre-finished the inside of the box before gluing it up, but before applying the shellac, I sanded the insides with 120, 180 and 220 grit sandpaper using my orbital sander.

For the finish (inside and outside of the box) I used a 1.5 pound cut of shellac. That means I mixed 1.5 ounces of shellac flakes to 8 ounces of denatured alcohol. The shellac I used was a blond shellac from BT&C. Also note that I covered up the dovetails as I didn't want the finish to get on them since they are going to get glue on them for the glue up.

I apply hide glue to the pins and put the box together.

The dovetails were a little tight so I needed to use some clamps to pull everything together.

This box will have a removable tray so I installed some 1/4" boards on the inside for the tray to sit on. Since I pre-finished the inside, I scuff sanded away the shellac and applied some hide glue and clamped them in to place.

Moving right along, next I cut the bottom panel to width and length over at the table saw. You can reference the cut list in the picture above for the dimensions.

I apply some hide glue and put the bottom on.

I put some clamps on the bottom panel to hold it while the glue dried. I also put some 1 1/4" 3d finishing nails on the bottom panel.

Next up I cut the trim to width over at the table saw.

This trim has a chamfer that runs along the top, outside edge so I mark that out with my combination square. I have it set to 1/4" and run a line along the top.

And then I run a line 1/4" on the side.

Then I use my number 3 hand plane(number 4 plane or block plane would work just fine) to put the 45 degree chamfer on the trim, connecting the two lines.

Came out pretty good.

Next up, I tilt my table saw blade and cut the miters in the trim. I will eventually cut these by hand but I need some more jigs for my shooting board.

With the trim all cut, I glue and nail them in to place.

Again, I used the 3d finish nails.

Finally it's time to install the hinges. I mark them out using my marking knife and combination square and use my saw to cut the kerfs.

Then I switch over to my 1" chisel and knock out a majority of the waste.

Then using my small router plane I cut the mortises to a consistent depth.

Fit like a glove.

I taped the hinges to the top to temporarily test the fit. The blue tape allowed me to move the top around just a tad bit and still remain in place.

With the lid fitting how I wanted it to, I put the screws in, starting with the back to make sure I can remove the tape and it won't move too much. After I installed the hinges I installed the trim on the top the same way I installed the trim around the bottom.

I used the same shellac and applied it to the rest of the box. I wiped the shellac on the box but the underside of the lid has the trim which overhangs and creates a ledge. For that, I used a cheap hake brush which works well with shellac.

Finally I add the escutcheon plate to the front of the box using brass nails. And with that, the box is complete. Only thing left is for me to make a tray for the inside of the box but I want to see what i'm going to use it for first. Thanks for checking out the photos!


